Every sewing project has moments when stitches need to come out.
A seam may turn out uneven, a hem may sit at the wrong height, or two pieces of fabric may have been joined incorrectly. These mistakes do not mean the entire project is ruined. With the right tool and a little patience, stitches can often be removed cleanly so the fabric can be corrected and sewn again.
That is exactly what a seam ripper is designed to do.
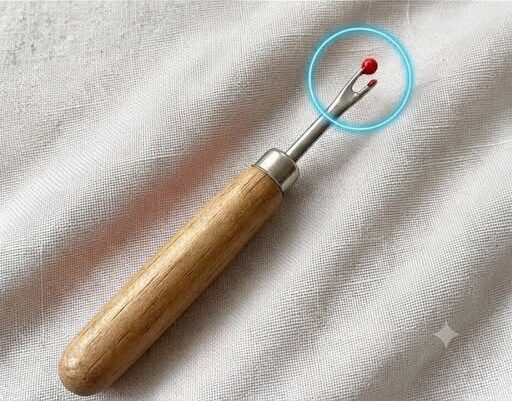
A seam ripper is a small handheld sewing tool with a pointed metal tip, a rounded end, and a tiny curved blade between them. The pointed end slides carefully beneath a stitch, while the blade cuts the thread without requiring the user to pull hard on the surrounding fabric.
Although it looks simple, the tool is designed for precision.
Using ordinary scissors to open a seam can be risky because the blades are often wider than the small space beneath the stitches. It is easy to accidentally catch the fabric while trying to cut the thread.
A seam ripper gives much more control.
Before removing any stitches, place the garment or sewing project on a clean, flat surface. Good lighting is also important, especially when the thread color closely matches the fabric.
Identify exactly which section needs to be opened before you begin.
Removing more stitches than necessary creates extra work and can weaken areas that were already sewn correctly.
Gently spread the fabric so the stitches are easier to see, but avoid pulling the material tightly.
To begin, slide the pointed tip beneath one stitch.
Keep the point as close to the thread as possible.
Lift the stitch slightly and guide it toward the small curved blade until the thread is cut.
Repeat the process with several nearby stitches.
Once a few threads have been cut, gently separate the fabric layers with your fingers.
If the seam does not open easily, do not force it.
Simply cut another stitch.
Pulling too hard can stretch the needle holes or damage delicate fibers.
One of the biggest secrets to using a seam ripper safely is patience.
Trying to remove an entire seam in one quick movement may seem faster, but it greatly increases the risk of cutting the fabric.
Working a few stitches at a time gives you much more control.
For a long straight seam, some sewists cut every second or third stitch on one side and then turn the fabric over to gently remove the longer thread from the opposite side.
If the thread does not release easily, continue cutting additional stitches rather than pulling harder.
Different fabrics also require different levels of care.
Lightweight and delicate materials can be especially easy to damage because the sharp point may pass through the fabric instead of beneath the thread.
Keep delicate fabric supported on a flat surface and use only a small lifting motion when positioning the seam ripper.
Check the material frequently.
If it begins to stretch, bunch, or distort, smooth it before continuing.
Heavy fabric can seem safer because it is thicker, but it still requires caution.
Thick seams often contain several layers and stronger thread.
Avoid forcing the seam ripper through tightly packed areas because excess pressure can cause the tool to slip suddenly.
Instead, look for an exposed stitch and begin there.
Once a few threads have been removed, the remaining stitches usually become easier to reach.
Bulky areas such as cuffs, waistbands, hems, and reinforced corners may contain several rows of stitching, so make sure you are cutting only the seam that actually needs to be removed.
A seam ripper is particularly useful when adjusting hems.
If trousers, skirts, sleeves, or curtains need to be shortened or lengthened, the existing hem often has to be opened first.
Begin near a side seam or another accessible point.
Cut several stitches and gently unfold the fabric.
Continue along the edge in small sections until the entire hem has been released.
Removing the stitches carefully is especially important when lengthening a garment because preserving the fabric inside the original hem gives you more material to work with.
Seam rippers are also valuable during clothing alterations.
Side seams, waistbands, sleeves, and linings often need to be opened before the fit of a garment can be changed.
Mark the exact section that needs adjustment before removing stitches.
This prevents a small alteration from turning into a much larger repair.
The same tool can also make replacing a zipper easier.
A zipper is often held in place by several rows of stitching.
By carefully cutting those threads in small sections, the zipper can be removed without damaging the surrounding garment.
Avoid pulling the zipper away while stitches are still holding it in place.
Instead, continue cutting until it releases easily.
After any seam has been opened, small pieces of thread usually remain trapped in the fabric.
Remove longer pieces with your fingers.
A soft brush can help clear away shorter fragments.
Do not scrape aggressively across the fabric with the seam ripper because the blade is intended for cutting stitches, not cleaning the surface.
Check both sides of the material for loose thread before sewing the area again.
It is also worth inspecting the fabric itself.
Look for stretched needle holes, pulled fibers, puckering, or other signs of stress.
Many small stitch holes become less noticeable once the material is gently smoothed and allowed to relax.
Avoid stretching the fabric aggressively in an attempt to close the holes.
That can distort the shape of the seam.
One common mistake is trying to push the seam ripper rapidly along an entire line of stitching.
While experienced sewists may sometimes use faster techniques, doing this without control can cause the blade to leave the thread line and slice directly into the material.
Another mistake is pulling the seam apart before enough stitches have been cut.
If resistance remains, stop and remove more thread.
Using a dull or damaged seam ripper can also make the job harder. Instead of cutting the thread cleanly, a worn blade may pull and stretch it.
Good lighting, a sharp tool, and slow movements make the process much safer.
Most importantly, needing to remove stitches should not be viewed as failure.
Even experienced sewists unpick seams.
Fabric shifts.
Measurements change.
A garment may fit differently once it is tried on.
Sometimes a seam simply does not look as good as expected.
Removing it and sewing the area again is often the best way to achieve a cleaner result.
A seam ripper allows mistakes to become corrections rather than permanent problems.
It can help fix crooked seams, uneven hems, incorrectly attached sleeves, misplaced pockets, and many other common sewing issues.
Used properly, it protects the fabric while giving you another opportunity to get the construction right.
The key is simple: cut the thread, not the fabric.
Work slowly, keep the material supported, and never force a seam to open before enough stitches have been removed.
With patience and careful technique, a seam ripper can become one of the most useful tools in any sewing kit.
Instead of seeing unpicking as starting over, think of it as part of the process.
Sometimes the cleanest, most professional result begins by carefully undoing a few stitches and trying again.